 AudioStrada
El manual está escrito en inglés y en francés.
Instruments
AudioStrada comes with two instruments: Strada-Synth and Strada-Drums, and plays any CLAP, VST3, VST2 or LV2 instrument. A new instrument track opens the browser on the instruments to choose its own. Instruments go first on their track; several can lead it, layered: they play the same notes, their sounds add up, and the effects after them process the mix. Right-click an instrument's insert › Add an instrument… to layer another, Change instrument… to replace the first one. Drum tracks start with Strada-Drums and take layers the same way.
Strada-Synth
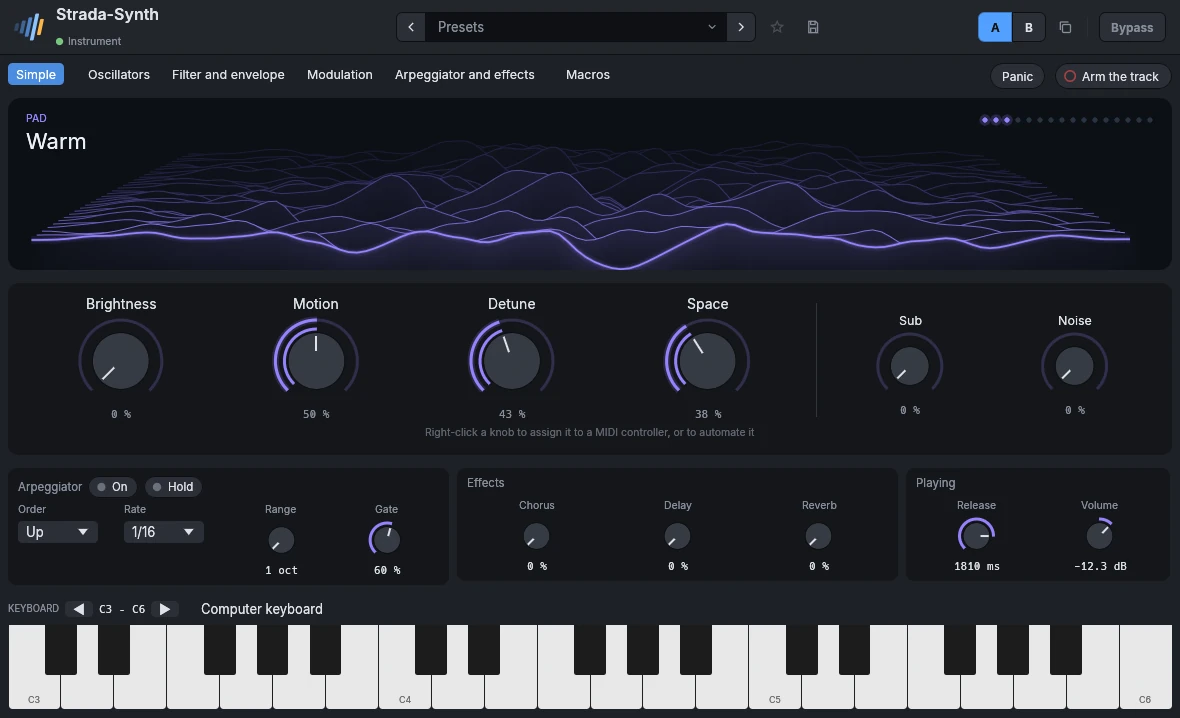
A polyphonic synthesizer: two oscillators with unison and wavetables, a sub oscillator and noise, a filter, two LFOs, an arpeggiator and its own chorus, delay and reverb. It opens on its Simple view, made for playing. At the right of its views, Arm the track arms the track for your MIDI keyboard without going back to the mixer, and Panic ends every note, a held arpeggio's too. The window keeps its height from view to view, maximized or not: the picture or the scope at the top takes the room the controls leave.
- The sound shows at the top, drawn by its wave in the color of its family: a landscape for pads and strings, rings for bells and plucks, a ribbon for basses and leads. Click the picture for another one, double-click to give it the whole window, in every color. Choose another sound in the presets, or step through them with the Left and Right arrows.
- Four macros, each named after what it does to this sound (Brightness, Motion, Space...): one knob moves several settings at once, so a quarter turn is plainly heard. A macro at zero means none of what it names: a sound that comes with some vibrato or some reverb opens with that macro already turned up.
- Sub and Noise beside them add the sub oscillator (a pure sine under the sound) and noise (breath, air).
- Right-click any of these knobs to assign it to a knob of your MIDI controller, or to automate it.
- Under them: the arpeggiator (on, hold, order, rate, range and gate), the chorus, the delay and the reverb, then the glide of a sound that plays one note at a time or the release of one that plays chords, and the volume.
Four views show the synth itself, a few panels each: Oscillators (with the wavetables, the sub and the noise), Filter and envelope, Modulation (the LFOs, the second envelope and the list of what they modulate) and Arpeggiator and effects. Right-click a knob, then Modulate by, to have an LFO, the second envelope, a macro, the velocity, the mod wheel or the pressure move it; choose a ticked source again to stop it. In Modulation, you can also drag an LFO's or the second envelope's name onto a knob. Expert adds the controls few sounds need: fine tuning, FM, sync and ring, key tracking, drift, the depth of the LFOs and MPE.
Macros shows the four macros, each with what it moves and by how much: click a macro's name to choose another, Add a target to have it move one more setting. A macro (and the mod wheel) also reaches the effects, the envelope's times, the detune and the speed and depth of the LFOs.
- Presets hold some eighty-five ready-made sounds by family: basses, leads, keys, pads, strings, brass, plucks, bells, poly, arpeggios, atmospheres and effects. All play at the same level.
- The keyboard plays the synth without arming the track: click or drag across the keys (lower on a key plays louder), or turn on Computer keyboard to play with the letters: A S D F G H J K for the white keys, W E T Y U for the black ones, Z and X for the octave. Keys go by position, so AZERTY works the same.
- MPE (in the expert controls) is for MPE controllers (Roli Seaboard, LinnStrument, Osmose), which send each note on its own channel.
Parameters
| Parameter | Range | Default |
|---|---|---|
| Osc n wave | Saw, Square, Sine, Triangle, Wavetable | Saw |
| Attack | 0.5 – 2000 ms | 5 ms |
| Decay | 1 – 4000 ms | 300 ms |
| Sustain | 0 – 100 % | 70 % |
| Release | 1 – 8000 ms | 400 ms |
| Cutoff | 40 – 18000 Hz | 2500 Hz |
| Resonance | 0 – 95 % | 20 % |
| Filter envelope | 0 – 100 % | 40 % |
| Osc n detune | 0 – 50 cents | 8 cents |
| Velocity sensitivity | 0 – 100 % | 70 % |
| Volume | -48 – 6 dB | -12 dB |
| Pitch bend range | 1 – 24 st | 2 st |
| MPE (channel 1 global, 48 st per note) | on / off | off |
| Osc n octave | -3 – 3 oct | 0 oct |
| Osc n semitones | -12 – 12 semi | 0 semi |
| Osc n fine | -50 – 50 cents | 0 cents |
| Osc n level | 0 – 100 % | 100 % |
| Osc n unison | 1 – 16 voices | 2 voices |
| Sub level | 0 – 100 % | 0 % |
| Sub octave | -1 octave, -2 octaves, Same octave | -1 octave |
| Noise | 0 – 100 % | 0 % |
| Stereo spread | 0 – 100 % | 50 % |
| Analog drift | 0 – 100 % | 10 % |
| Glide | 0 – 2000 ms | 0 ms |
| Voice mode | Poly, Mono, Legato | Poly |
| Filter type | Low-pass 12 dB, Low-pass 24 dB, Ladder 24 dB, High-pass, Band-pass, Notch | Low-pass 12 dB |
| Filter drive | 0 – 100 % | 0 % |
| Key tracking | 0 – 100 % | 0 % |
| LFO n shape | Sine, Triangle, Saw up, Saw down, Square, Random | Sine |
| LFO n rate | 0.05 – 20 Hz | 4 Hz |
| LFO n sync | on / off | off |
| LFO n note | 1/32, 1/16 T, 1/16, 1/16 D, 1/8 T, 1/8, 1/8 D, 1/4 T, 1/4, 1/4 D, 1/2, 1 bar, 1/2 T, 1/2 D, 2 bars | 1/8 |
| LFO n retrigger | on / off | on |
| Envelope 2 attack | 0.5 – 4000 ms | 5 ms |
| Envelope 2 decay | 1 – 8000 ms | 400 ms |
| Envelope 2 sustain | 0 – 100 % | 0 % |
| Envelope 2 release | 1 – 8000 ms | 400 ms |
| Macro n | 0 – 100 % | 0 % |
| Modulation n source | None, LFO 1, LFO 2, Envelope 2, Velocity, Mod wheel, Pressure, Macro 1, Macro 2, Macro 3, Macro 4 | None |
| Modulation n target | None, Pitch, Osc 1 pitch, Osc 2 pitch, Osc 1 level, Osc 2 level, Sub level, Noise, Cutoff, Resonance, Filter drive, Volume, Osc 1 position, Osc 2 position, FM, Chorus, Delay, Reverb, Detune, Attack, Decay, Release, Filter envelope, LFO 1 rate, LFO 2 rate, LFO 1 depth, LFO 2 depth, Envelope 2 depth | None |
| Modulation n amount | -100 – 100 % | 0 % |
| Osc n wavetable | Basic shapes, Harmonics, Pulse width, Vocal, Metallic, Sync, Fold, Organ, Loaded file | Basic shapes |
| Osc n position | 0 – 100 % | 0 % |
| FM | 0 – 100 % | 0 % |
| Sync | on / off | off |
| Ring | 0 – 100 % | 0 % |
| Chorus | 0 – 100 % | 0 % |
| Delay | 0 – 100 % | 0 % |
| Delay time | 1/32, 1/16 T, 1/16, 1/16 D, 1/8 T, 1/8, 1/8 D, 1/4 T, 1/4, 1/4 D, 1/2, 1 bar, 1/2 T, 1/2 D, 2 bars | 1/8 D |
| Delay feedback | 0 – 90 % | 35 % |
| Reverb | 0 – 100 % | 0 % |
| Reverb decay | 0.3 – 10 s | 2.5 s |
| Arpeggiator | on / off | off |
| Arpeggio | Up, Down, Up and down, Random, As played | Up |
| Arpeggio rate | 1/32, 1/16 T, 1/16, 1/16 D, 1/8 T, 1/8, 1/8 D, 1/4 T, 1/4, 1/4 D, 1/2, 1 bar, 1/2 T, 1/2 D, 2 bars | 1/16 |
| Arpeggio octaves | 1 – 4 octaves | 1 octaves |
| Arpeggio gate | 10 – 100 % | 60 % |
| Hold | on / off | off |
| LFO n depth | 0 – 100 % | 100 % |
| Macro n name | Auto, Brightness, Timbre, Resonance, Bite, Grit, Drive, Warmth, Air, Breath, Sub, Body, Width, Detune, Thickness, Motion, Vibrato, Wobble, Speed, Tremolo, Space, Reverb, Echo, Chorus, Shimmer, Attack, Release, Length, Swell, Morph, Shape, Metal, FM, Sweep, Growl, Impact, Punch, Octave, Fifth, Pitch, Glow, Color, Vowel, Fold, Sync, Ring, Hollow, Fade, Dirt, Squelch, Bloom, Drift, Pulse, Harmonics, Hammer, Depth | Auto |
| Envelope 2 depth | 0 – 100 % | 100 % |
Strada-Drums
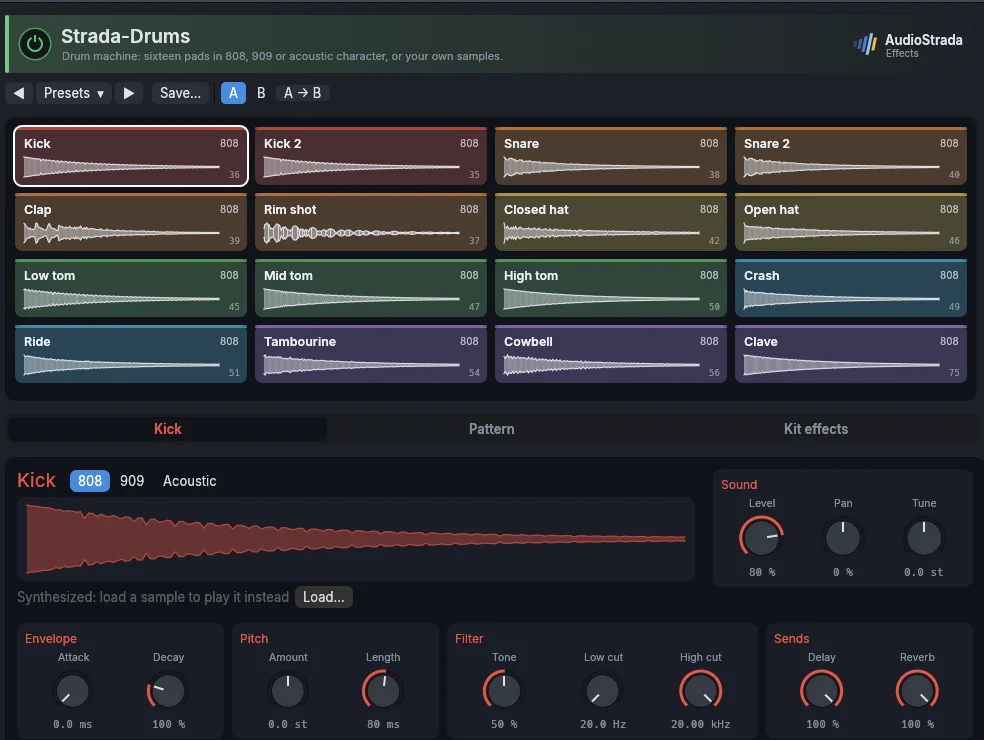
Track › Add drum machine track creates a track with Strada-Drums: sixteen pads on the General MIDI drum notes, so that the piano roll and any pad controller play them.
Pads
A pad lights up while it sounds and plays when clicked (lower on the pad plays louder). Clicking it also selects it, and the pad tab below shows its sound:
- Character: 808, 909 or acoustic, or Load… a sample of your own.
- Sound: level, pan, tune. Envelope: attack, decay. Pitch: amount and length of the pitch drop. Filter: tone, low cut, high cut. Sends: to the kit's delay and reverb.
The closed hat chokes the open one. The presets hold whole kits by style (hip hop, trap, drill, house, electro, Latin, Afro, lo-fi, drum and bass…).
The Kit effects tab holds the compression, colour, EQ, delay and reverb of the whole kit. Analog makes every hit a little different, as on an analog machine: a few cents of pitch, a slightly longer or shorter decay, a little softer or darker; the factory kits use some of it.
Pattern
The Pattern tab is a step sequencer over the track's MIDI clip at the playhead: what you draw here is what the piano roll shows. Without a clip, New pattern creates one at the playhead's bar, with the number of bars chosen beside it.
- Steps: click to set or clear a step, drag across to paint, drag a step up or down for its velocity, right-click for its roll, flam and chance. A step's fill rises with its velocity, an accent has a bright edge on top, a ghost note is paler. Clicking a pad's name plays it.
- Swing pushes the off sixteenths toward triplets.
- Rhythms holds more than ninety ready-made rhythms by genre: hip-hop, trap and drill, R&B and pop, house, techno, electro and breaks, drum and bass, UK garage and bass, Latin and Caribbean, Afro, funk, soul and disco, rock, synthwave and 80s, lo-fi and chill. Each has its groove, a variation and a fill: the pattern then plays them in a cycle of four bars (the groove, its variation, the fill), each one a variation of the chain to edit. Each shows its usual tempo; the project's tempo is left alone.
- Clear empties the variation shown.
Variations and chain
Bars play variations: A, B, C… up to Z, and a Fill. A variation is edited once for all the bars that play it.
- + B puts a second pattern on every other bar, + Fill a fill at the end of every four bars, with a snare build-up to start from. Once B exists, + C, + D… add a variation on a new bar at the end, copied from the one shown.
- Sections: + Section makes an Intro, a Bridge or an Outro from the variation shown. The intro takes a bar before the others (the pattern starts a bar earlier when it can, so that the groove stays where it was): the hats and a kick on one, with a snare build-up to come in. The bridge goes at the end, in half time without the hats; the outro is one last hit, kick and crash. Each is a variation like the others, to edit or move in the chain.
- Names: right-click a variation, or a bar of the chain › Rename, to name it (Intro, Verse, Hook, Bridge, Outro, or your own); its name shows in the chain and on the pattern in the timeline. Two variations never share a name: a second intro becomes Intro 2, and menus show each one's letter beside its name.
- The chain shows what each bar plays. A click on a bar shows its variation and takes the playhead there; right-click to change what it plays, or to make the bar a new variation that keeps its notes.
- Bars: the number at the start of the chain sets the pattern's length, from 1 to 64 bars. New bars repeat the chain; bars past the end go, with their notes.
In the timeline
- The pattern followed: the Pattern tab edits the pattern selected in the timeline, else the one under the playhead.
- Variations shown: on a pattern clip, each bar shows the variation it plays, in its chain's colour. Right-click a bar › Bar N plays to change it without opening the drum machine.
- Lengthened, it goes on: dragging a pattern's right edge adds bars that follow its chain (the groove, its variation, the fill…), instead of empty bars.
- Rhythms dragged: drag a rhythm from the Rhythms menu to the timeline for a new four-bar pattern at that bar, on the drum track under the pointer, else on a new drum track.