 AudioStrada
El manual está escrito en inglés y en francés.
Mixing
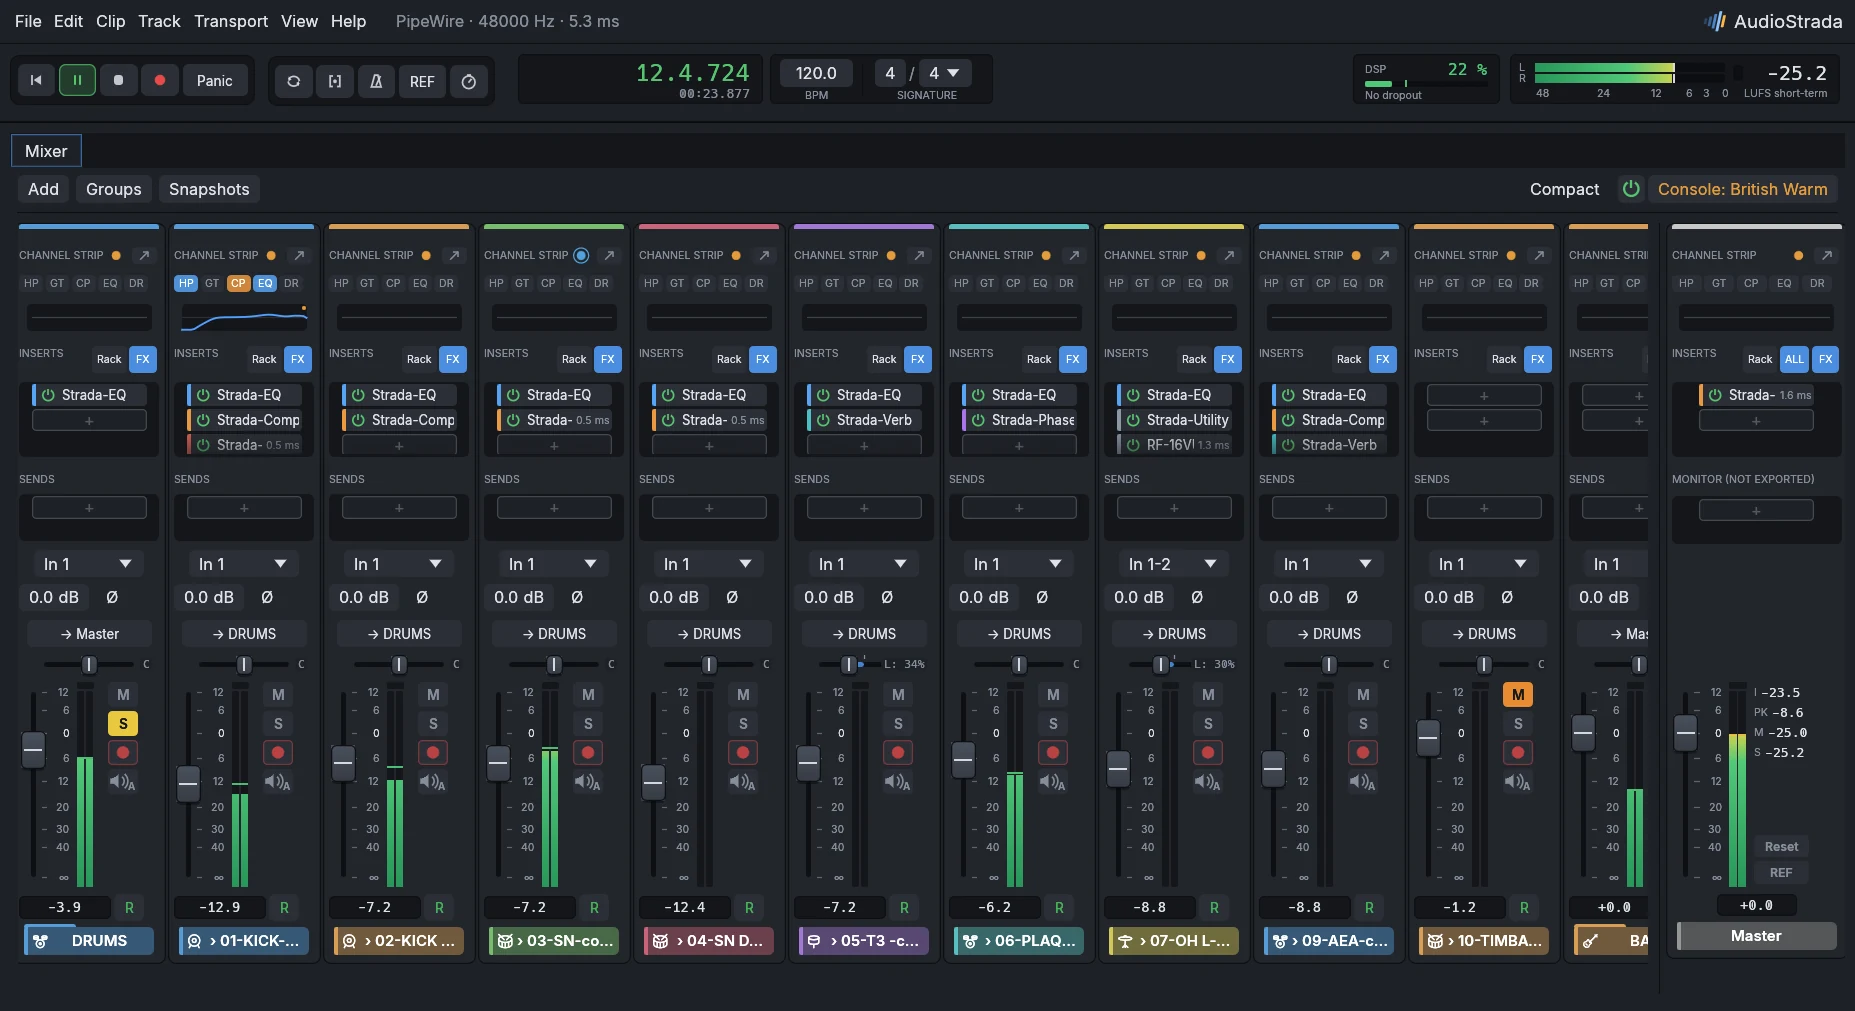
Channel strips
Each track has a strip in the Mixer, in the order the signal goes through it: the input with its gain and polarity (Ø), the channel strip, the inserts, the sends, the output (and VCA), then the pan beside the automation mode, the fader and meter, mute (M), solo (S), record arm (R) and the track's name, marked BUS for a bus and VCA for a VCA. The fader takes the height the panel leaves. Right-click the empty space beside the strips to add a track, a bus or a VCA; a click there clears the selection.
Solo keeps what the soloed track goes to audible. Soloing a bus also plays the tracks routed into it, and the tracks sending to it through their sends only: a soloed reverb bus plays the reverb alone, without the dry sound of what feeds it.
- Docked in the main window, the strip leaves its height to the fader. Beside the meter, in the signal's order: the channel strip's button, then FX with a pill per effect (a click opens the effect, Shift-click bypasses it, Ctrl-click removes it) and + to add one, then Sends with a pill per send showing its level. FX and Sends (lit, with their count, when the list holds something) open the whole list just under them, to reorder or add; a click elsewhere closes it. The master has its channel strip, FX and Mon (monitoring effects).
- In its own window (View › Mixer › In its own window, Ctrl+M), each strip shows its effect and send slots: click an empty slot to add an effect or a send. The lists are as tall as the longest one, plus an empty slot, and leave the rest to the faders. Ctrl+M again docks it back. Compact mixer (Shift+Alt+C, also in Preferences › Appearance) narrows the strips. Right-click the master to put it at the left of the tracks, or back at their right.
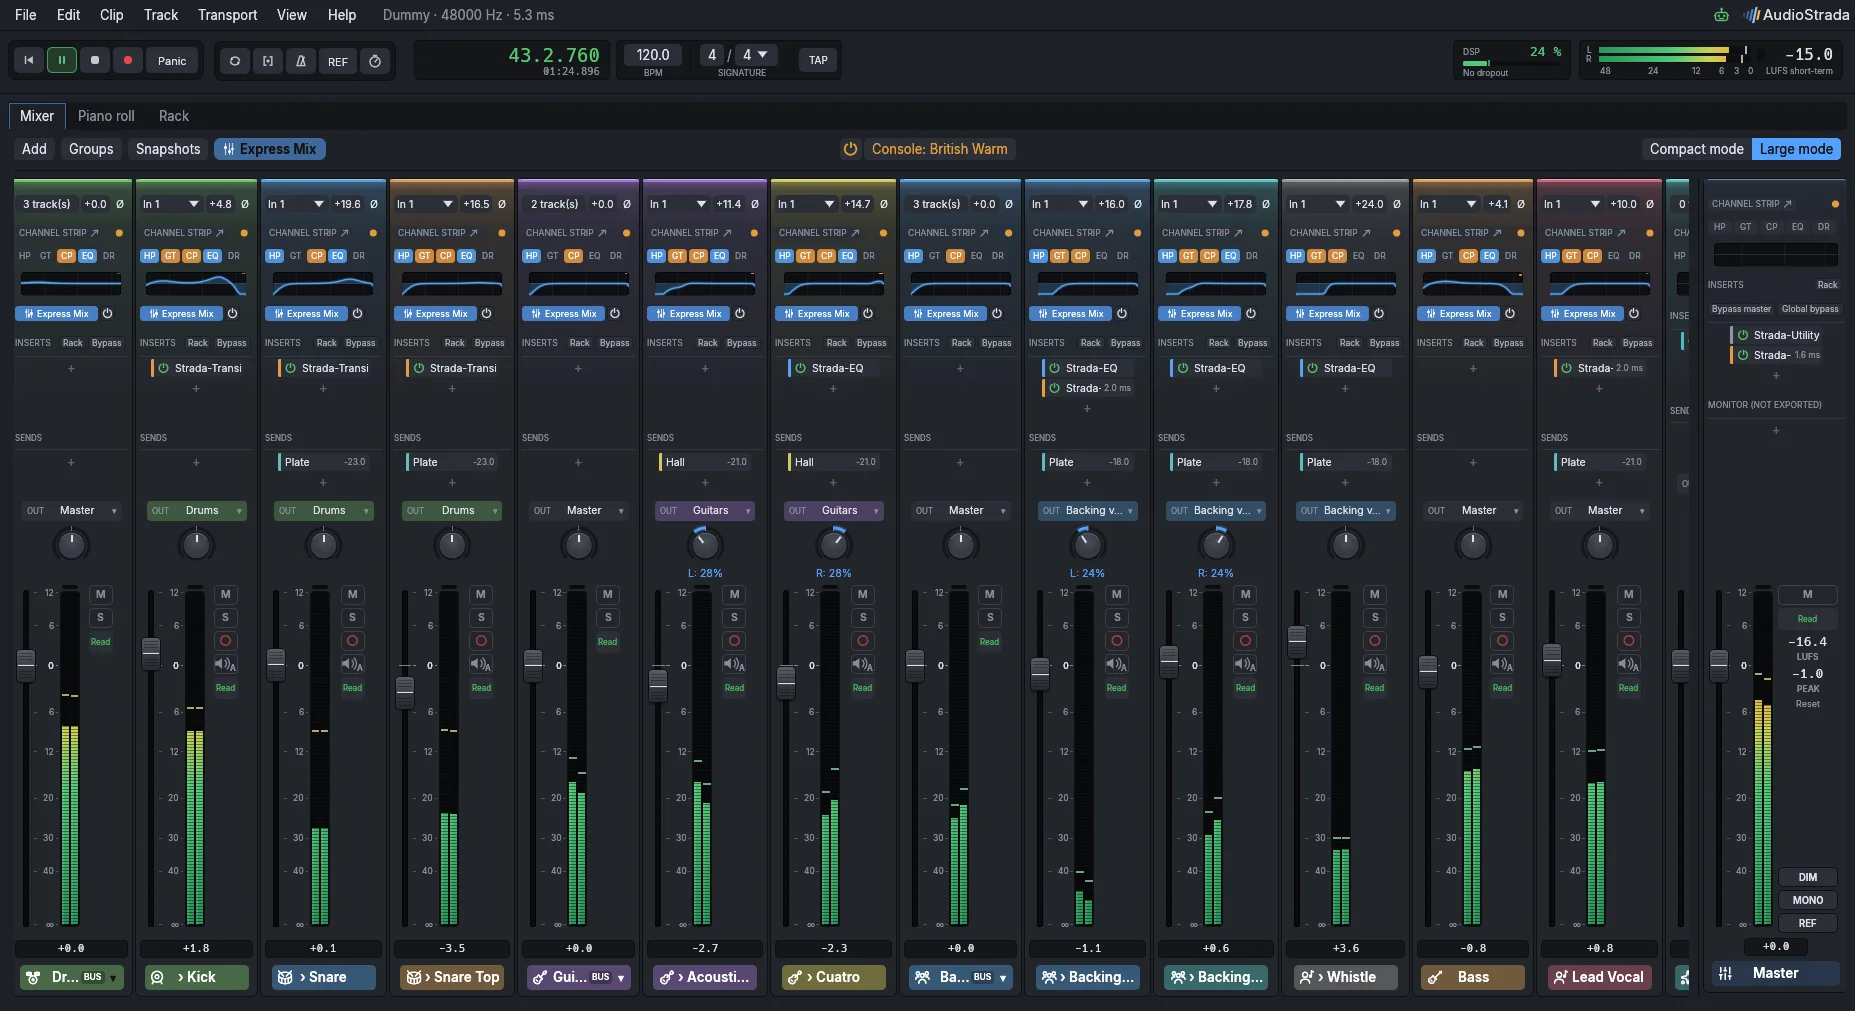
Faders and pan
- Faders follow a console law (0 dB at three quarters of the travel): drag them, Shift for fine moves, double-click for 0 dB.
- Pan: the knob under the output, its value under it. Drag up or right (Shift for fine steps; the centre holds the pointer), double-click to centre.
- The mouse wheel moves the fader (half a dB a notch, Shift: a tenth), the pan (1 % a notch) and the sends of the selected track only, so that passing over the mixer moves nothing.
Selecting tracks
Click a name plate (or a track header in the timeline); Ctrl adds or removes, Shift extends. Colour, duplicate and delete in the track menu act on every selected track, and so do the output menu and the fader: moving one selected fader moves the others by as many dB. Drag a name plate to move tracks. Shift+Alt+M, Shift+Alt+S and Shift+Alt+R mute, solo and arm the selected tracks.
Inserts
- Click + insert or an empty slot to open the effect browser; click an effect to open its window.
- In the browser, the left column picks a family, your favorites or the effects added lately; the search looks through everything, the buttons at the top keep one format or one vendor. A click chooses an effect and shows its presets below, a double-click or Add (Enter) adds it. The arrows move between the cards, / goes to the search, F stars the chosen effect.
- Shift-click bypasses an effect, Ctrl-click removes it, right-click for the other options; Sidechain there chooses the track keying an effect that has a sidechain input, and Replace… puts another effect or plugin in its place.
- Drag an effect to reorder it, or onto another strip to copy it there (Alt: move it). Drop it on the list to choose the place, anywhere else on the strip to put it last.
- Bypass above the inserts bypasses every effect of the strip, and stays lit while they are bypassed. The master has its two on a line of their own: Bypass master for its own effects, Global bypass for every effect of the session (an instrument leading a track keeps playing). Under them, Same loudness makes the global bypass a fair comparison: the whole mix is measured in the background with its effects and without them, and while every effect is bypassed the mix is raised (or lowered) by the difference, so you judge what the effects do rather than how loud they make it. It is heard only, never exported, and measured again a moment after each change.
Effect windows show, in their bottom bar, the track driving the detection for the effects that have a Sidechain, the level going in and coming out (peaks and loudness) and the Output gain after the effect, kept in the mix and the export. Match is a listening aid: while it is lit, the output is brought to the input's loudness, so that bypassing the effect compares it at equal level. It is never saved nor exported and turns off when the window closes; Keep moves its correction into Output.
Above that bar, the song plays without leaving the window: play and pause, S to solo the track the effect is on (the same solo as in the mixer), the loop, and the whole song drawn from what the effect hears, with its markers. A click on it plays from there, a drag loops the passage (playback starts at its beginning), a marker's name plays from it; the loop button turns the loop off and on again. Express Mix has the same bar.
The rack
The Rack tab (Alt+6) shows the chain of the selected track (or of a pinned channel) as modules side by side, each with its main controls, A/B, and its editor a click away. Parallel chains split the signal into branches of their own and mix them back.
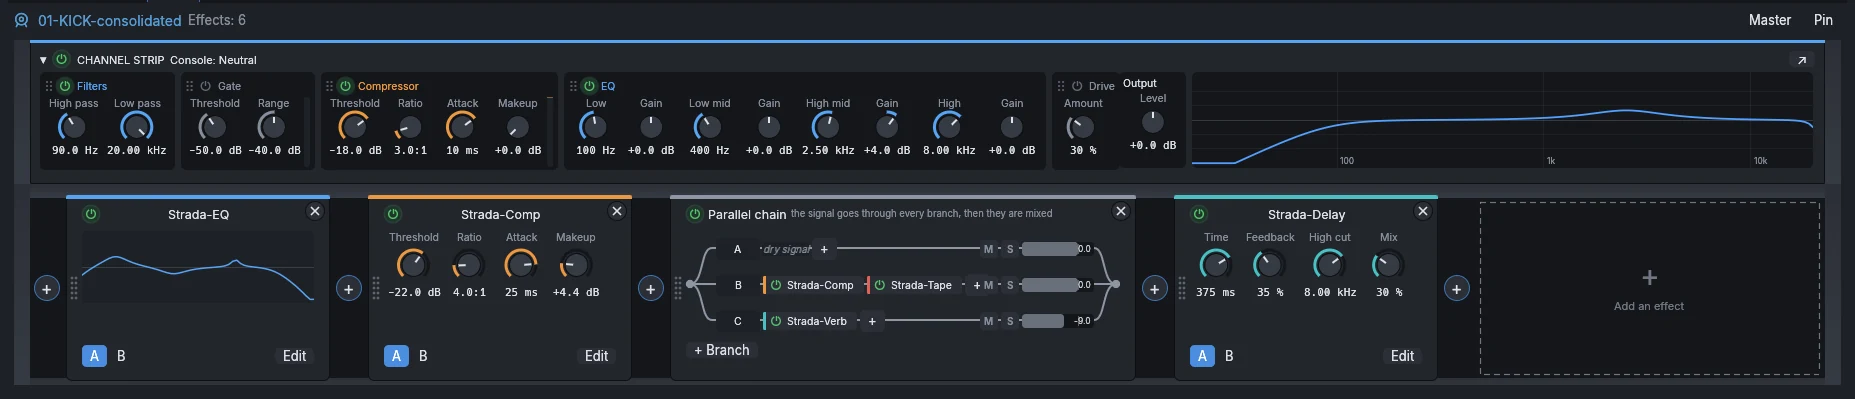
Outputs, buses and sends
- Output: the button above the pan says where the sound goes: Master, a bus, or No output. Its menu routes every selected track at once, and New bus for n tracks makes a bus for them, placed where the first of them was and named after them (Drums). Track › Route the selection to a new bus (Ctrl+Shift+B) does the same. The menu is also in the track's right-click menu and in the Inspector.
- Buses sum the tracks routed to them through their own inserts, sends and fader, then go to the master. They hold no clips. In the timeline the tracks of a bus show under it and fold with it, in the mixer too (the arrow on the bus's name plate); dragging a track among them routes it there. Track › Add › Add bus makes an empty one, for a reverb fed by sends.
- Sends go to any track or bus (pre or post fader); the menu of an empty send slot lists the buses first, and New effect bus makes one fed by the send. The send is added to every selected track; tick Cut the output to the master first for tracks heard only through the send. Each send is a button like an insert, with its level (and PRE before the fader): a click opens its settings window (destination, pre or post fader, level, mute, Remove the send), the wheel sets its level. Drag a send to reorder it, or onto another strip to copy it there (Alt: move it).
- VCA: the track's right-click menu chooses the VCA that controls it; a V under the fader shows it.
Groups
Select tracks and press Ctrl+G. A group has nothing to do with buses: the tracks of a bus stay each on its own unless they are grouped. The Groups menu sets what members share: level, pan and sends (relative), mute, solo, arm, inserts bypass, automation mode, polarity, and editing (a click on a clip or a track in the timeline takes the members' too, so cuts, moves, trims and fades apply to all).
Hold Ctrl to use one track's control or select one clip alone. Ctrl+Shift+G switches every group off and on.
VCAs
Track › Add VCA, with tracks selected, makes a fader that moves their levels and mute together, keeping their balance.
- The VCA strip lists the tracks it controls: a click selects one, the × on hover takes it out of the VCA. Assign selected adds the selected tracks.
- Member faders stand at the level heard, their own plus the VCA's, and move when the VCA moves. Moving a member's fader changes only its own level; its tooltip shows the split.
- Automation: a VCA has a volume lane and an automation mode, like any track. Its curve is added to the level of every track it controls, whether they have their own automation or not.
Console colour
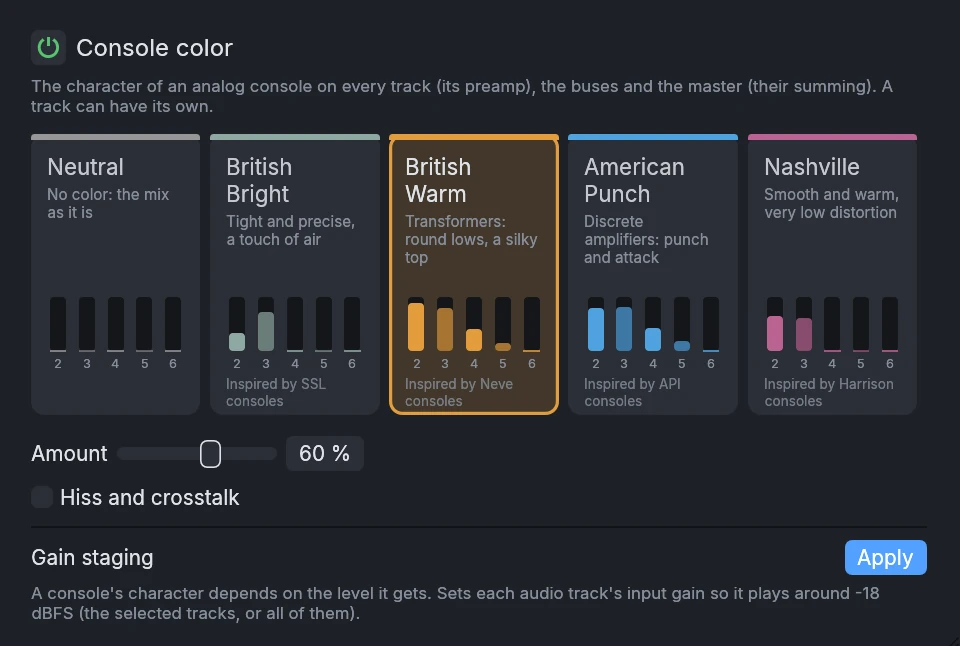
The Console menu in the mixer's bar gives the whole mix the sound of an analogue console: every track goes through the input stage of one of its channels, the buses and the master through its summing.
| Console | Character |
|---|---|
| Neutral | no colour: the mix as it is |
| British Warm | transformers: round lows, a silky top (inspired by Neve consoles) |
| British Bright | tight and precise, a touch of air (inspired by SSL consoles) |
| American Punch | discrete amplifiers: punch and attack (inspired by API consoles) |
| Nashville | smooth and warm, very low distortion (inspired by Harrison consoles) |
Each console is a circuit of analogue stages (transformers, class A amplifiers, op-amps, VCAs), calibrated on measurements of the plugins that model the console it is after, with a signature that grows with the amount: British Warm rounds the lows and softens the top; British Bright tightens the bottom, brings the upper mids forward with some air, and its mix bus glues the mix (a gentle compressor, 1 to 2 dB at 50 %); American Punch gives punch in the low mids and bite; Nashville warms the low mids, softens the highs and widens the buses a little.
Amount: 25 % is the console as its references measure it, as discreet as a real one at the working level; 50 % runs it hot, as on records, where it is heard; above, its character is exaggerated (6 dB hotter and three times the signature at 100 %); 0 % is nothing. The buses and the master are pushed half as hard as a track, as they get the whole mix. The console keeps the loudness all along: switching it, or changing the amount, changes only the colour. Projects saved before keep their sound (their amounts are halved when they open). Hiss and crosstalk adds each channel's noise floor (hiss, a little hum) and the sides of the buses leaking into each other. Every track is a channel of its own: its parts differ slightly from its neighbours', which widens the mix as a real console does. Each track can take another console (Track console). The power button beside the menu switches every colour off at the same level, to compare.
A console's character depends on the level it gets: Gain staging › Apply sets each audio track's input gain so that it plays around -18 dBFS (the selected tracks, or all of them).
Strada-Channel
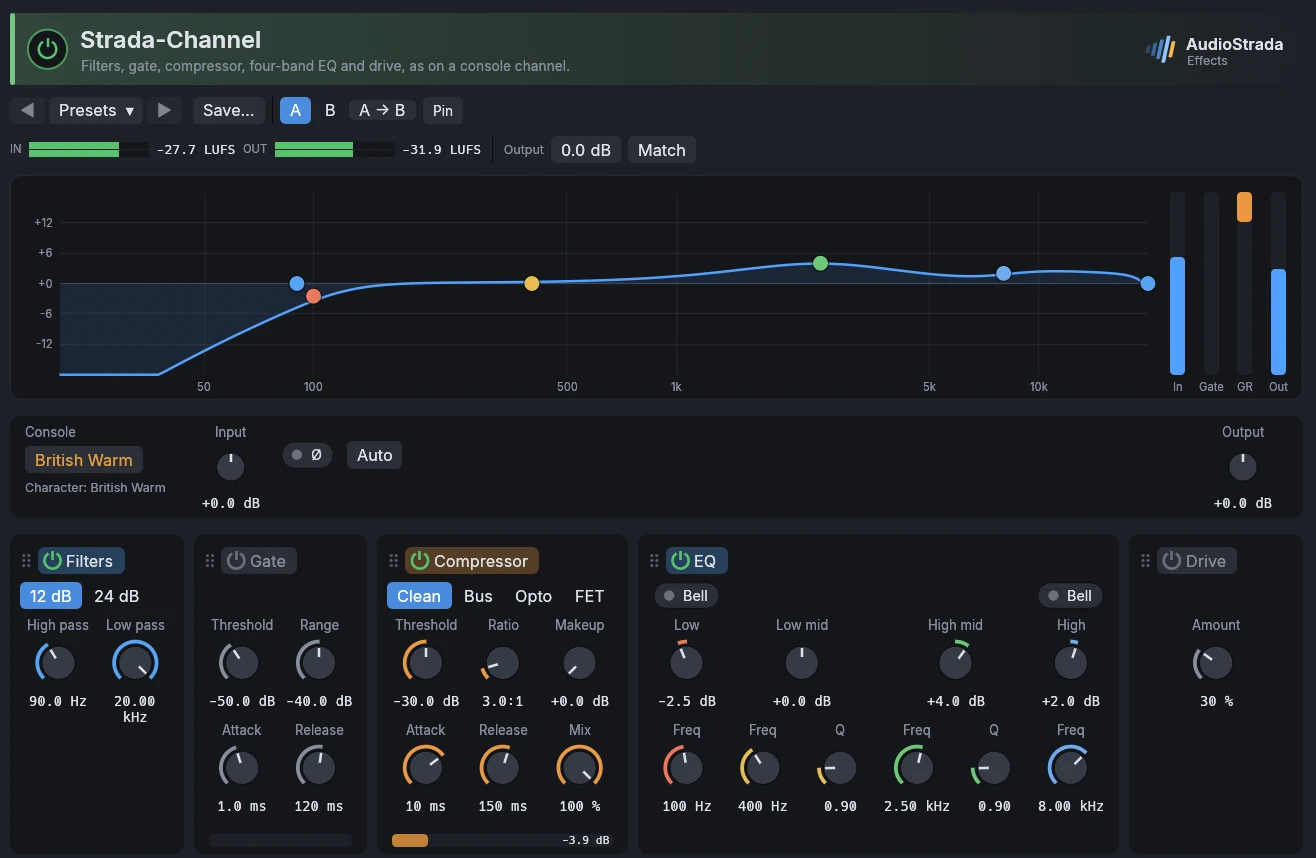
Strada-Channel is a whole console channel in one insert: filters, gate, compressor, four-band EQ and drive. Its window shows the EQ curve with its handles and the meter bridge, the console, the track's input gain and polarity, then the modules in the order they play; drag a module by its grip to reorder it. See Effects for its parameters.
Express Mix
Express Mix, under a strip's Channel strip, sets the track up, or every selected track: a click cleans it up and brings it out, a right-click (or the track's right-click menu, or Track › Express Mix) chooses one of the two or removes the Express Mix. Once the track has it the button is lit, and the switch beside it bypasses everything the Express Mix did (the strip's modules it set, the effects it added, the ride, the pan, the console color, the send to the space), to compare with the track as it was; a second click puts it all back. Express Mix, at the top of the mixer, does it for every track at once (not the buses).
Track › Express Mix with no track selected takes every audio track. The Express Mix opens in a window of its own, which you can move to another screen.
With several tracks not prepared yet, the window first asks to Check the tracks while they are listened to: each one's instrument as found from its name and its sound (to correct, or to choose when nothing tells it), whether it is included, its mute and solo, and whether to Group into buses, with the buses it would make (on unless the tracks are already in buses). Continue leads to the settings, where all of it can still be changed.
The settings have two tabs. Mix sets every track at once:
- Style: what the mix should sound like, at an Intensity set across the window. Each style leans the tone, doses the compression and the attacks, moves some instruments forward, and brings its console color (shown on its tile), its space, its ambience and its width, which you can then change:
- Transparent (the default): as in the room, nothing pushed; a lighter hand, no console color added (the project's stays).
- Warm: round and soft, vintage; softer highs, fuller low mids, slower compression; British Warm.
- Clean: defined and modern, never harsh; tighter low mids, a little more presence, the voice forward; British Bright.
- Punchy: the rhythm up front; more weight and attack on the kick, the snare and the bass, firmer compression, the drums forward; American Punch.
- Big: large, wide and airy; more lows and air, a wider image, a live hall; Nashville.
The intensity also doses the console: 25 % (the console as measured) at the usual 50 %, 50 % (run hot) all the way. - Then one knob for each part, double-click comes back to its usual place: - Clean up: a high pass well under the energy that counts (an octave under the lowest note that matters, gentle, 12 dB per octave), a low pass on the bass, the kick and electric guitars, cuts only at the resonances that really stand out, the plosives and the sibilance of a voice held down, and a gate or a gentle expander where there is bleed between the hits or the phrases (drums, voices, backing vocals, acoustic guitars): the bleed of a choir mic no longer comes up with the compressor. A track with long silences gets the suggestion to strip them. - Bring out: each instrument brought to its usual tone. AudioStrada measures how much of the track's energy sits in its lows, low mids, presence and air, compares it with what that instrument has in a mix that sounds right, and moves the strip's EQ only part of the way, only where the track is clearly off, within gentle limits; a track already right is left alone. The kick and the bass also get some weight. Then a compressor when the level moves (always on a kick, a snare and a bass), a Strada-Transient on drums and percussion, and, if you tick it, a riding of the level. - Balance, at 0 until you turn it up: moves the faders toward a balanced mix, where each instrument usually sits against the lead vocal (kick a little above it, bass at its level, backing vocals and guitars under it...), moved by the style. The mix keeps its loudness. - Space: how much reverb each instrument gets. The kick, the bass, the hi-hat and the overheads stay dry. - Ambience: which space, in four zones of the knob, the size growing within each: Studio (dry and close, a small room), Natural (a room for the drums and the percussion, a plate for the voices and the snare, a hall for the rest), Live (one concert hall for everything, a short slapback on the lead voice), Spatial (a vast, floating reverb, a dotted eighth echo on the lead voice, the drums kept nearer). The tails follow the tempo, their lows cut so that they never muddy. Changing zone while playing fades the reverbs out and in, so that nothing clicks. - Width: pairs left in the center (two guitars, backing vocals, toms...) are spread around it, following the L and R of their names; a track panned by hand is left alone.
For a single track, the window is that track's page, with its settings in a band above it: the style, then Clean up, Bring out, Space and, while the project has no space yet, Ambience. What belongs to the whole mix is left out: the style changes neither the project's console nor the buses, and there is no balance, width or headroom for the master.
Tracks lists the tracks, under the buses they go into, with the Group into buses switch at the top: drag a bus to change their order. Each track has a switch (off, it is left as it is), its mute and solo, and its instrument. Click one to see what is proposed for it: where it goes in the mix (input gain, bus, space, echo, pan), its spectrum before and after, and the steps of each part, each with its switch and its amount (50 % is what is proposed).
- Gain staging, always: each track's input gain first brings it to -18 dBFS where it plays, the level its console and its compressors expect; the thresholds proposed follow, and the level heard stays the same.
- Same level, always: what the processing changes is given back on the strip's output, so that every track keeps its loudness and louder never passes for better. The fader is the Balance's.
- Keep room on the master (ticked by default): with a Strada-Master, a maximizer or a limiter on the master, when the mix peaks above -6 dBFS, a Strada-Utility first on the master lowers it to -6 dBFS and that effect is raised as much: its processing gets room, the loudness heard stays the same. Without one, the mix is lowered only when it would clip, to -1 dBFS, and the window says so before you apply. Express Mix adds no limiter of its own.
- Hand-set modules: a module of the channel strip (filters, gate, EQ, compressor) you switched on and set yourself is left as it is.
- Nothing at zero: with Clean up, Bring out, Balance, Space and Width at 0 and the Transparent style, nothing is touched: the mix is identical to the original.
AudioStrada renders each track alone, as it reaches its channel strip, several at a time, and guesses the instrument from the track's name and its sound: a man's or a woman's voice by its pitch, whistling above any singing voice, an acoustic guitar by the highs no amplifier gives, a voice beside a track named as the lead (Lead, Main...) as a backing vocal, and plucked strings such as a cuatro or a ukulele as an acoustic guitar. When nothing tells it, the track is set to Something else and marked.
A bus (or a folder) is prepared as a sum: a gentle high pass and a slow compressor that glues it (2:1), lighter as more of its tracks are prepared, and on the drums a gentle lift of lows and highs as a tube EQ gives. Once the instrument is known, the track's icon follows it (unless you chose one). - Both, and Remove the Express Mix.
While the window is open the proposal is heard: Listen plays the session, Before and After compare. Above them, a bar shows where the song plays, over its outline, with its markers: click or drag to go to a passage, click a marker's name to hear it. Apply writes everything in one undo step; Cancel or closing the window leaves the tracks as they were.
The settings are those of the channel strip, plus a Strada-EQ after it for the resonances and the plosives (its bands dynamic when they come and go), a Strada-DeEss and a Strada-Transient. Running the Express Mix again, on one track or all of them, updates what was done: nothing is added twice, and the window opens with the settings last applied, saved with the project. These are starting points, to adjust by ear.
Snapshots
Snapshots save the state of the console and recall it, to compare two mixes.
Master and reference
- The master shows beside its meter the loudness of the mix since Reset (LUFS, integrated; streaming platforms bring songs to about -14) and its highest PEAK (in red over -1 dB, where it may clip once encoded).
- M at the top, then its automation mode, as on the tracks. M, Dim and Mono change only what you hear, never the export: M mutes the speakers, Dim lowers them by 20 dB (to talk, or answer the phone), Mono sums left and right to check the mix in mono. They are off again when the project opens.
- A click on the master's strip selects it: the rack and the Inspector show it.
- MONITOR holds effects you hear but that are not exported: room correction, a reference.
- REF beside it (also in the transport bar, Alt+R) compares the mix with a finished song (Transport › Reference track… to choose it). Click it to hear the reference instead of the mix, at the same place in the song and, by default, at the mix's loudness, so that you compare the sound and not the level. Its window shows the loudness of both and by how many dB they differ. It is never exported.